I think I’m addicted to posting. When I’m not posting I’m thinking about my next post. My conversations with my husband often revolve around which craft project I’m thinking of posting next. He’s being doing such a good job I’ve decided to appoint him my editorial assistant. I’m not quite sure if he sees this as such a great promotion though.
I like making games with kids and I’m always trying to find new ways to make them. It’s good for kids to play with games they’ve made themselves. They learn that the simplest materials can be turned into something really great, that it doesn’t have to cost a lot to be good…it just needs a lot of love and care in the way it’s put together.
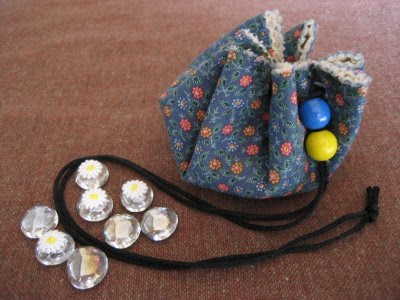
One of the first games I designed was a O’s & X’s pouch. I make it with 7-8 year olds who have come to a few of my classes so they have some sewing experience. I’m posting 3 different versions of the pouch. The first version is made with cotton, the second with felt and the third is a glued version i.e with no sewing at all (this is for anyone who doesn’t trust their sewing skills).
The game pouch is made from two circles each 23 cm in diameter. The cotton version has a middle layer of wadding to give thickness. The grid of the game is made up of four rectangular strips 15cm long x 1.5cm wide. I’ve used Vlisofix to stick the grid on in the cotton and unsewn felt versions, but in the sewn felt version, I pin the the grid strips in place while I’m sewing because I find Vlisofix a bit hard to sew through. The holes for the carry cord have been made with a hole puncher designed to make holes in leather.
In the cotton version I contrast different materials for inside and outside to give visual interest. A satin cord with a few beads threaded on helps to hold the pouch closed. Also, you need to sew the game grid onto the inside circle before you sew the inside and outside circles together (and remember to put a circle of wading in-between them).
If you look you’ll see that I’ve also sewn tiny beads around my game grid to give it a delicate decorative effect.
And I also like the effect of a scalloped edge (I’ve got wavy scissors that do this) with this sort of material.
Here is the sewn felt version of the game pouch. Whatever you sew onto the outside circle should be sewn on before you sew the two circles together. And be careful not to place the pieces of your design too close to the edge of the circle – you will need to leave a border of 1cm to punch your cord holes into. Also remember: only punch your cord holes through after both the inside and outside circles have been sewn together.
When I design the outside I tend to leave the centre of the circle more or less empty because this is the base on which the pouch rests. Here I’ve made the flower centres fairly big in order to show the girls in my classes different ways of sewing their flowers on.
Finally a glued felt version that doesn’t require any sewing at all..
Have fun making the game pieces from anything you want. In the past I’ve used clay, stones & shells, buttons, etc. Here I’ve taken some glass beads, cut off some flowers from an old piece of trim, glued them onto one group and left the other group plain in order to distinguish the “O’s” from the “X’s”.

Phew! Hope it’s all clear. But if you have any questions, you know where to send them.


Trixi I love not only the things you make but your philosophy as well – that simple things made with love and care are all you need.
I will be filing this one away to make when my girls are a little older.
Congrats to your Ed assistant on his new appointment!
Oh my goodness – genius! I am totally going to make one of these too! Thanks for sharing!
These are so cute. I can't wait to make one for the kids perfect for on the go.
aaaaarrrgggg this is brilliant!!! i have only had a quick run through so i will have to come back for a slower look when i have time… but i like what i see!!
Thanks Karen, I'll pass on the congrats. Rosie, the post might be bit long but it's a really simple craft.(I promise!) Polka Dot Daze and Helena: Hope your kids enjoy their game.
Trixi I just love this, I am just looking for sewing projects I can start my daughter with, things we can do together. Perfect and thanks!
Hello, I made your X's and O's pouch and posted the photos on my blog. I linked to your tutorial. Just love the project. Love your blog for that matter! Thanks!
https://4crazykings.blogspot.com
شركة تنظيف رخام بالرياض
شركة تنظيف زجاج الابراج بالرياض
شركة تنظيف سيراميك بالرياض
شركة تنظيف بيوت الشعر بالرياض
شركة تنظيف بيوت الشعر شرق الرياض
شركة تنظيف بيوت الشعر غرب الرياض
شركة تنظيف بيوت الشعر شمال الرياض
شركة تنظيف بيوت الشعر جنوب الرياض
شركة تنظيف الاثاث بالبخار بالرياض
شركة تنظيف السجاد بالبخار بالرياض
شركة تنظيف موكيت بالبخار بالرياض
شركة تنظيف مجالس بالبخار بالرياض
شركة تنظيف منازل بالرياض رخيصه
شركة تنظيف منازل بالرياض مجربه
شركة تنظيف منازل بالرياض عمالة فلبينية
شركة نقل اثاث بالرياض عماله فلبينية
شركة تنظيف رخيصه بالرياض
شركة تنظيف فلل بالرياض عمالة فلبينية
شركة لرش المنازل من الحشرات
التعاون
شركة رش الدفان شرق الرياض
شركة رش الدفان شمال الرياض
شركة رش الدفان غرب الرياض
شركة رش الدفان جنوب الرياض
شركة مكافحة الوزغ بالرياض
شركة تنظيف خيام بالرياض
شركة مكافحة الهاموش بالرياض
شركة مكافحة الناموس بالرياض
شركة ترميم بالرياض
شركة ترميم منازل بالرياض
شركة ترميم فلل بالرياض
شركة ترميم قصور بالرياض
شركة ترميم شقق بالرياض