Yay, I’ve made it to Matchbox Monday 4, and this time it really is Monday. Big applause. Hope that the past month has shown that there’s more to the humble matchbox than meets the eye.
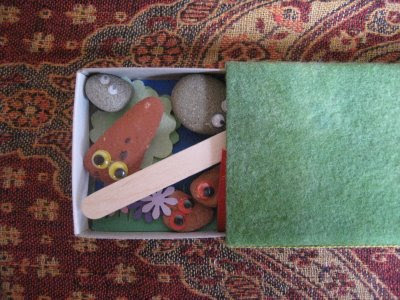
The matchbox I’ve used here is 12cm x 7cm x 2cm. You could use other sizes, but this is probably getting close to the smallest size that is still practical for kids to play with. The photos I’ve posted are pretty self-explanatory, but here are some comments on some of the choices I’ve made.
I covered the box with a green wool felt which I dyed myself. It’s really a lot of fun and not that hard to do. I used a microwave method which is very quick and simple. And you can get the most beautiful colours with all sorts of subtle variations in them that you just can’t get from commercially dyed felts. Trim on the side of the matchbox can give your theatre a bit of pizazz.
On the bottom of each rock I have glued a small magnet, and to move the actors over the stage I have used two pop sticks with a magnet stuck on each end. Remember that magnets have two poles, so check that the upside of the one stuck to the pop stick is attracted to (and not repelled by) the down side of the magnet stuck to your rock fellow before you glue. And take care, there’s a big difference in the quality of magnets. Some are just really weak and not very good. Get magnets that seem fairly strong. Also, if they’re too strong you might find that your actors jump into each others arms as soon as they get close. A bit of experimenting solves all these little problems. The back of the stage is also held in place with magnets: two above and two below.
The background scene is a separate piece of cardboard that can be removed and replaced by other scenes. I stick a small bit of ribbon to the back to make it easy for kids to take out without crumpling the whole thing up. I used double sided spongy tape to stick on the shapes. It gives a nice 3-D effect and the truth is that painting the background can be a little tricky if you’re not a good painter. It’s not hard to end up with a mess. This way you get bright colours and clear sharp outlines.
I’ve chosen to make my actors from small rocks. Collecting the rocks can be fun for the kids. Actually, when my kids were little they used to get the smooth pebbles that fell through from our neighbor’s fence and painted them with bright acrylic colours. And I think that sometimes they “helped” them fall through. The orangy red rocks in the photos (below) wash up on the beach here. The flat dark grey fellow (above) is a bit of slate – the little chipped bit makes a nice mouth. It can also be fun for the kids to get a whole pile of rocks they’ve collected and try to see what sort of creature they can make from them.
The last photos show all the pieces and how they pack up. Matchbox magic!


this stuff is really thrilling!!
%*_*%
Hiya, I nominated your blog for a One Lovely Blog Award. You can find out about it on my blog. Have a lovely day!
I love this craft! So adorable!
This is adorable, and I'm so thankful you're sharing your talents with the rest of us!
Your things are SO CUTE!! You are a really talented lady, thank you for sharing your great ideas for the matchboxes…I went to work tonight on a matchbox travelling doll house for my daughter for Christmas (will blog about that in the coming months!) and I am totally planning to make this for my son, who is 5. He'll love it! Blessings to you~
What a wonderful idea! this is too cute.. I'm totally gonna make this one for my boys. you're very creative and your blog is awesome 🙂
Delghtful idea!
Congrats for your so pretty and funny works 🙂
Woooooow, great idea!!! I will be your follower, wow!!
LG
This is really creative and adorable! Well done!