My Fridge magnet DIY who is affectionately called Fridge Shnookie is a project I designed years ago when I just started teaching craft classes. The classes were after school and much shorter than my present holiday workshops, so I was making up projects that didn’t take too long to sew.
Fridge Shnookie was great but the magnets were a bit tricky for the younger kids and in a class situation I ended up running all over the place trying to make sure everyone got it right. In the end I stopped using him but never really forgot him.
So here he is. I think he’ll make a great project. If your kids are doing the sewing you mums might want to supervise the magnets or you might find Fridge Shnookie acting a little oddly. If you’re a little unsure about teaching your kids to sew then have a read of this Sew with Kids post and let me know how you go!
I’ve drawn up a template for Fridge Shnookie which you can find here.
Some simple instructions:
1) Cut out 2 body shapes and 2 ear shapes from felt using the templates given.
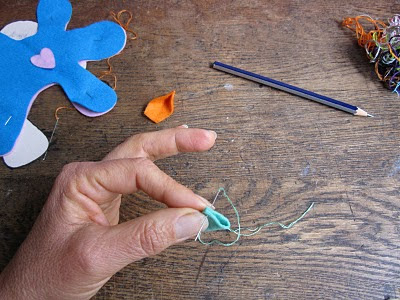
2) Fold the ear shape in half and sew along the line indicated in the template. The photo below shows what the finished ear should look like and how to pinch and sew it together:
3) Take 6 magnets…make sure you get good quality ones…they should have a decent pull…the cheaper ones won’t stick properly to your fridge.
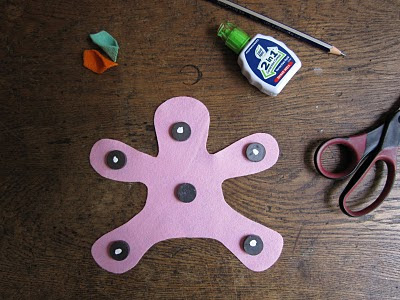
The tricky thing with magnets is that they have two opposite poles and for this project we need to have their poles arranged in a particular way. I make a little ‘tower’ by placing the magnets so that they stick one on top of the other. Then I dab the upward-facing surface of the top magnet with liquid paper, then remove the top magnet, and do the same for the next magnet and so on until I’ve taken my little tower apart. The important thing is to get a mark on the magnets that will help us to get the poles in the right position.
4) Take your magnets and glue them to the arms, legs and head with the dot facing upwards and to the tummy with the dot facing downwards as shown in the photo below:
5) If you want to sew a heart on remember to do it before you sew the two body shapes together.
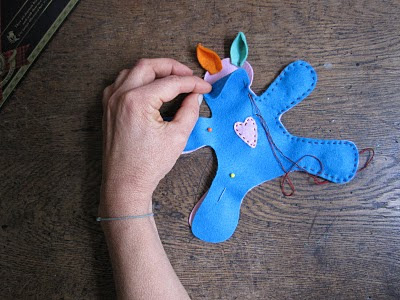
Now pin the two body shapes together. Pin the ears in position between the two pieces of felt as shown below. Sew the body together leaving an opening as indicated on template:
 Helpful Hint: I think it’s easier to sew Fridge Shnookie on a flat surface as this helps keep the magnets in his legs and arms from sticking together…you can also make him behave while you sew by placing him on a metal tray.
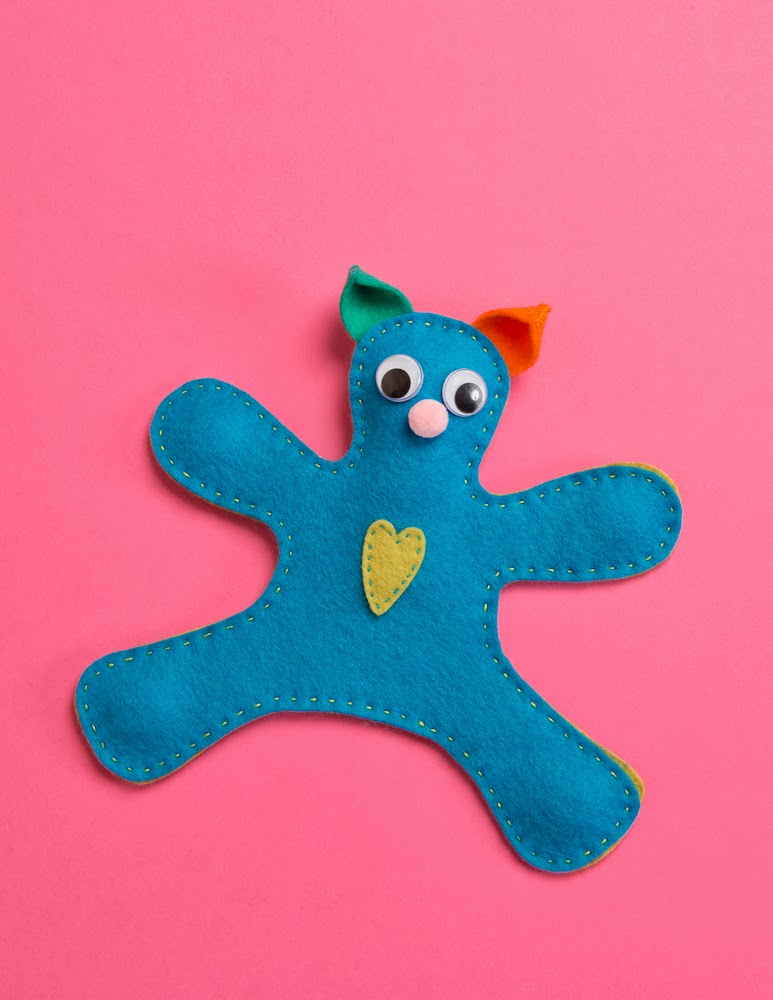
6) Push a little stuffing through the opening and up into the head and then stitch the opening closed. Glue on eyes and nose…and that’s it…you now have a Fridge Shnookie…which is really a very helpful and humorous addition to any family:


What a very cute idea. But I have no idea where to find magnets….
It's fantastic, I like it so much!
oh so cute. you should consider writing a little craft book of all these wonderful easy projects.
xxrosey
So cute, Trixi! My daughter makes little Quilt-magnets. Have a good weekend & thank you again!
Yeah Shnookie!!! What a guy!
Actually Trixi, a book would be a great idea.
Seriously Trix, this idea had endless possibilities!
xxxxxxSo wonderful to see a new post from you!!!
xxx
Hi Trixi,
He'd be fun company. He could hold allsorts of funny things or stand in all sorts of positions to amuse people as they approach the fridge,
Did you run your sewing group this holiday?
Hi Trixi.
Very cool this project!
Try to do.
And thank you for your visits!
Now that is just gorgeous!!!
Thanks for sharing your tutorial…
Jodie 🙂
Totally awesome Trixi – best idea for kids craft and gifts! Love these so much!!!
Love this, but I can't get the template to load!
Thanks for letting me know…I will get the tech guy (my son!) onto this asap.
Just found your blog via Whip Up. I love the Shnookie. I'm always on the look out for shorter sewing projects for my two girls. These would make great Christmas presents for them to give. Thank you for the inspiration!
I simply love, love, love the Fridge Shnookie! 🙂
(and this blog with lots of great ideas! Thank you!)
That is seriously cute!
and a lovely clear tutorial
Thank you
Back again. I have really been enjoying all your crafting ideas. I have an award waiting for you on my blog. Thanks for sharing.
Pretty cute!!
OMG you've out done yourself this time – I LOVE IT!
I have just made my very own shnookie. 🙂
https://ablumoo.blogspot.com/2010/12/fridge-shnookie.html
Thank you so much for showing me how. 🙂
Smiles from AbluMoo
♫°° Amiga,
°º♫ Desejo para 2011
° • ♫ "O sonho realizado…
°º ♫°° ♫♫ O amor esperado…
° ·. •*• ♫ A esperança renovada…"
Bj♥s
Brasil °º♫
°º
° ·.
This is so cute! I made one and blogged about it: https://sparetimecontinuum.blogspot.com/2011/01/fridge-shnookie.html
Thanks for the tute!
This comment has been removed by a blog administrator.
That is the cutest fridge magnet ever!! I think I might have to make a Shnookie family for my fridge, though they won't do much holding, lol, my little girl will play with them instead of her dolls!!
Thank you for sharing the tutorial, it's fantastic!!
This comment has been removed by a blog administrator.
شركة كشف تسربات المياه بالدرعية
شركة كشف تسربات المياه بعفيف
شركة كشف تسربات المياه بالغاط
شركة كشف تسربات المياه بثادق
شركة كشف تسربات المياه بالدوادمى
شركة كشف تسربات المياه بالمزاحمية
شركة كشف تسربات المياه بالقويعية
شركة كشف تسربات المياه بوادي الدواسر
شركة كشف تسربات المياه برماح
شركة كشف تسربات المياه بالأفلاج
شركة كشف تسربات المياه بحريملاء
شركة كشف تسربات المياه بالزلفي
شركة كشف تسربات المياه بضرما
شركة كشف تسربات المياه بشقراء
شركة كشف تسربات المياه بالسليل
شركة كشف تسربات المياه بحوطة بني تميم
شركة كشف تسربات المياه بالحريق
شركة كشف تسربات المياه بالمجمعة
شركة كشف تسربات المياه بمرات
شركة كشف تسربات المياه بالرس
شركة كشف تسربات المياه بعنيزة
شركة كشف تسربات المياه ببريدة
شركة كشف تسربات المياه بالمذنب
شركة كشف تسربات المياه بالدلم
Still unable to download the template help please!
If you click on the word HERE after the sentence
…I've drawn up a template for Fridge Shnookie which you can find HERE you'll get it.