Are you looking for an awesome pencil case for your kids? I hope so! What could be better than finding an amazing pencil case for your kids? I’d say getting your kids to design and sew their own pencil case. Win win.
I loved my coloured pencils and textas and rubbers when I was a kid and having a cute pencil case was a must. I had lots of different pencil cases over the years but never got around to sewing my own pencil case until I designed this one. My favourite part of this design is the easy way the zip has been sewn in. Perfect for kids and perfect for beginner sewers who aren’t sure about tackling a zip quite yet. Here’s another little coin purse I designed using the same method.

What you’ll need to sew your pencil case
Two 12″ X 12″ squares of felt in different colours
10″ zipper
Needle (I like to use embroidery size 9 or 10)
Pins
Sewing thread
Coloured felt to cut out shapes
Glue
How to sew your pencil case
1. Cut a 9″ X 1/4″ slit down the middle of each square of felt.

2. Lay a felt square on top of the zipper so that the teeth of the zipper show through the slit. Pin and sew the zipper into place.

3. Turn the felt square with the zipper face down and lay your second square of felt on top.

4. Sew around the zipper.

5. Turn over so that the zipper and its tag are face up. Open the zipper. Fold the square in half.

6. Pin together.

7. Sew around the sides.

8. Trim off any excess felt from the sides.

9. Turn the case right side out through the open zipper.

10. Now you’ve made a pencil case.

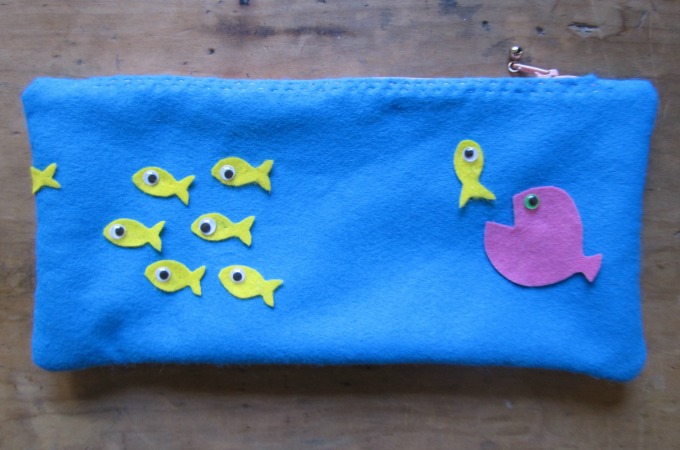
Cut out whatever shapes you wish to use to decorate your pencil case. Glue them into place. I’ve chosen to use an underwater scene…partly because the blue felt I’m using reminds me of the sea…and partly because these fish are easy to cut out and easy to arrange in interesting ways. I’ve made one scene on this side:
And a different scene on the second side…but if you look closely you’ll see that the two scenes are joined…so the little fish above whose yellow tail you can just see leads the eye around to the side of the pencil case shown below:

It’s also fun to add a charm or tassel to your zipper tag. I’ve attached a little metal bell to mine above. The pencil case below shows you a different kind of design which uses sewing, instead of glueing, to create a decorative effect. My daughter, Yiscah, made this…I guess that the warm orange evoked memories of gardens and summer:

On the other side she has used a few of the flower motifs but added something new with a word that may reflect her love of the Beatles and John Lennon’s songs…or perhaps just expresses how she was feeling at the time:

If you want to sew your design, you’ll need to cut out and sew your shapes into place in Step 2. It doesn’t matter whether you sew the shapes on before or after you sew in the zipper as long as you sew them on before you go on to Step 3…and remember to sew them on the side of the felt where the zipper teeth and tag are showing as this will be the outside of your pencil case.
Still want to make another pencil case? Try this easy DIY pencil case.
Have lots of fun, Trixi

A very cool project that will stimulate everyone's creativity.
What an excellent tutorial! I think I will do this with Martha this weekend! So effective! So simple! So wonderful!
sooo cute!!!! love this. The fish are adorable 🙂
So cute and simple! I just posted onto my blog, https://craftypeep.blogspot.com/2013/10/simple-hand-sewn-felt-pencil-case.html
please comment, my readers would love to hear from you!
this is a wonderful tutorial! It really makes sense to me and I'm eager to try, hopefully this weekend.
xo
I always dread finishing touches like putting a zip in all sort of purses and pencil cases. Never thought of cutting a slot in the fabric for the zip – great idea. Thanks for sharing!
This is a great tutorial! I will be featuring it in a round-up of gifts kids can make for Mother's Day 🙂
Thank you so much! I've always been intimidated by zippers. This was so clever and sweet.
Amazing idea!!! I can't believe how cute it turned out.
Marlene
Visit my site for Movers in San Antonio information
This is the great design and tutorial to make stationery box for the students, as it would become to easy for the students to hold their pencils, sharpener, eraser and scale in a single box so that they can find them easily once they need them. 🙂 best electric pencil sharpener reviews