Hi, this is the first of the Sew-a-Softie day tutorials. It’s a quick and easy to sew softie your kids will love…and so will you.
Sew-a Softie day is something that I’ve had tumbling around my mind for a long time and it’s really exciting to see it happening and to see the way its resonated with so many sewers and soon-to-be sewers. In the old days if you wanted to know how to sew you’d go to mum or grandma…Sew-a-Softie day is really an attempt to to revive this communal sharing of a highly practical highly creative skill…I hope that everyone involved experiences the unexpected rewards that I have experienced with sewing and discovers how much fun can be had in passing this skill on to others and to the next generation.
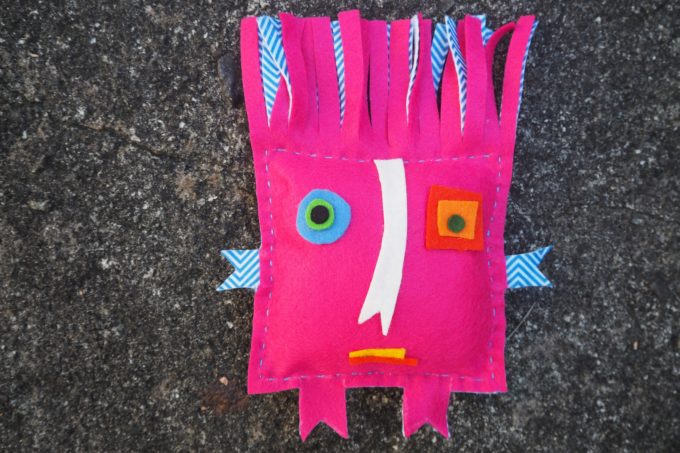
Initially, Sew-a-Softie day posed a design problem for me: how to design a softie that was really really simple-to-make but was flexible and full of creative possibilities. I came up with my Zenkidus. A Zenkidu is a softie that involves only two pieces of felt and some stuffing. They can be any shape but my first Zenki was square, and the tutorial I am giving here is based on a square Zenki because it’s an easy shape for first-time sewers to sew. And of course, every Zenki is an individual and must have a name. The little sweetie below, and the star of this tutorial, is Millie.
You can find the full list of softie making tutorials that are being posted over the next 16 days HERE…and don’t forget to post your softies on Instagram with the hashtag #sewasoftie.
Thanks for coming and I hope you enjoy the great tutorials on how to make simple-to-sew softies that will be posted from July 1 – 16.
Happy sewing, Trixi.
What You Need To Make Your Softie
20cm X 30cm plain felt
20cm X 30cm patterned felt
Scraps of coloured felt
china or wax pencil
What To Do To Make Your Softie
1. Draw a 13 cm X 13 cm square in the centre of the plain felt. This will be your sewing line. Use the scraps of felt to make the eyes, nose and mouth. Position the features and glue or sew into place.
2. Pin the plain felt onto the patterned felt. Use a running stitch to sew around the sewing line leaving an 8cm opening for stuffing.
3. Draw on the arms and legs. I’ve used a white china pencil but a soft lead pencil (2B or 3B) also works well.
- Push in stuffing through the opening. When your Zenki feels just right then sew the opening closed.
5. Cut off the excess felt from around the arms and legs and fringe the felt on your Zenki’s head to make his hair.
6. If you want, you can cut off the top layer of the arms and/or legs to reveal the patterned layer as I’ve done in the photo. And don’t forget to give your Zenki a name.
If you’d like to see a video tutorial of me making another Zenki here we go:


This little guy is super cute, great tutorial 😀
You said on the video you used a wax pencil to draw around your template – where do you get those, it works so well. I always have trouble drawing on felt.
Can’t wait to see all the others.
Hi Mignom and thanks so much:). Yes they are one of my favourite sewing tools and like I told Domenica you can’t find them in sewing stores!! I also tried all the chalk markers etc at Spotlight but they didn’t work…so the one I use is a Staedtler Glasochrom pencil available at art supply stores. I find the white to be the best and it rubs off pretty easily too! Let me know if you need more info about the pencil.
Thanks Trixi, I’ll check them out =D
I listened to the Podcast today – well done, I really enjoyed it =D
Mignon
Thanks 🙂 It was hard for me to do because I was really nervous!
I realised that I haven’t left a comment yet! I love Millie! Your video turned out great too! Well done ?.
Thanks Domenica! I think I may look back on that tutorial one day and cringe but it’s a good start!!
Looks like the project is going very well, Trixi, so much inspiration. I’m happy for you.
Amalia
xo
Thanks Amalia ,I loved the variety of projects that people posted and just seeing all the different ways people made their simple softies!!
I plan Girl Scout events and I am intrigued by this, and hope to offer it during a Fall event. I have always been hesitant to use glue guns when there are lots of young girls — I think they work great when it is parent-child situations, but harder in groups. I was wondering what your experience has been using adhesive backed felt? (Perhapos this is answered somewhere on your website and I haven’t looked at everything yet.)
Hi Pat, I haven’t used adhesive backed felt but I did ask about it in my group. Some people thought it was great others found it didn’t stick very well. I use Bostik glue stick. Its kid friendly and easy to use and sticks felt really well .Im not sure if that brand is available where you live but if it isn’t try a few different brands and see how they work. Let me know how you go 🙂 Trixi
What type of needle can I use to have children (ages 6-9) sew felt? Also could you please recommend a type of felt easy to sew and soft. Thank you, Susie